I am a complete novice when it comes to Fimo Polymer Clay. So I was maybe more than a little ambitious when I asked to review the Millefiori Fimo Kit. However I wanted a challenge and something to get my teeth into.
I was even more intrigued when I viewed these gorgeous creations HERE. I especially love the bracelets!
This is the ‘Workshop in the box’ that I was sent:
You can purchase both from HERE.
The Millefiori Kit is £8.75 and the Basic Bead Roller is £8.75. (please click each item to be taken to the full description and to order)
In the box were 4 blocks of Fimo Classic, and what is described as a modelling roller (red spatula). The box then unfolds, really neatly to provide instruction for 3 different style canes. To the right is the bead roller, which I will cover later.
Millefiori is a technique that is usually used in glass, it is a coloured pattern based on Italian glass blowing that is repeated many times hence its translation ‘thousands of flowers’
The basic technique is to build up the Fimo to a design that can be stretched to a cane (a long length) and this is where I kept getting unstuck. As I could build up the design, but found it really tricky to lengthen this to a cane! But please note this is by no means a negative review. I think I just need lots more practice!
Once the cane has been made, you slice the cane into small pieces. So for all your effort you do get lots of the decorative pieces to make your creations. You can use them for jewellery, decorate glass and picture frames.
Following my first attempt, it did make an attractive marbled effect. So after an initial sulk, I decided I should use this to practice using the bead making roller. Which was really simple to use and very effective.
With the bead roller you just put a ‘measure’ of the Fimo (using the tool provided) into the roller and just slide up and down, Its that simple!
You can make three different shape beads. I found this really satisfying almost therapeutic, so made lots!
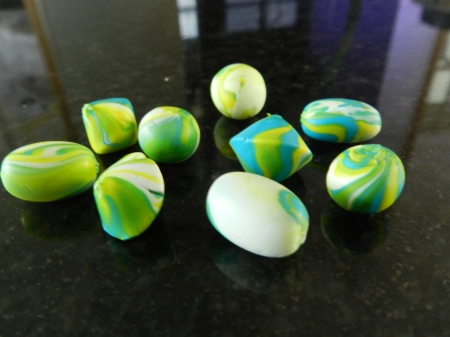
Here are the results of some of my marbled beads :
They are the same size and very even. It was hard for me to show this in the photograph. You can see the three different style beads, which were round oval and cone-shaped.
I then gently put a needle though each bead and baked in the oven for 30 mins at 110 degrees centigrade. I then threaded each of the beads onto a memory wire and I am going to use them as mini wreaths on the christmas tree.
I am going to continue to practise with the Fimo clay, I am determined to be able master Millefiori!
So watch this space!
Thank you for reading…..
This is a review, I was sent the bead roller and fimo kit, free of charge (no further fee given) The opinions I have expressed are my own.


Wow, I really loved fimo as a kid. Clever stuff, love the bead idea, well done you looks impressive!
Thanks so much for the comment! I think, I’m going to buy a kit for the children to have a go at now, we may become the Fimo Family 😉
Considering you haven’t done it before, it looks amazing! I will have to treat myself and have a go!
Awh thank you, you are very kind!
I love fimo 🙂 I don’t know why you were sullking – your beads look amazing!
It was fun trying….just really wanted to be able to do it! I will not be defeated!!!
Loved your ‘after the initial sulk’ comment – that’s so me!!
Glad you tried again though, your beads look amazing. Such a clever idea with the memory wire too. x